はじめに
前回は、Googleが発表したpre-trainedの汎用言語表現モデルであるBERTについて、自然言語処理分野の背景も交えてご紹介しました。

第二回となるこの記事では、BERTを実際のタスクに使用し、その性能を確認してみたいと思います!
1.タスク設定
BERTを用いて精度を確かめるタスクとして、小説の著者当てを行いたいと思います。分類させる小説家として夏目漱石と森鴎外を選び、著作として夏目漱石は「こころ」、森鴎外は「雁」を青空文庫からダウンロードしました。ファイルサイズは「こころ」が366KB、「雁」が164KBでした。データのバランスが少し気になりますが、今回はこのままいきます。
2.前処理
このままでは検証に利用できないので、前処理を行います。まずは必要なライブラリをインポートします。
|
1 2 3 4 5 6 |
import re import random import csv from tiny_tokenizer import SentenceTokenizer sentence_tokenizer = SentenceTokenizer() |
次に前処理部分を関数化します。
|
1 2 3 4 5 6 7 8 9 10 11 12 13 14 15 16 17 18 19 20 21 22 23 24 25 26 27 28 29 30 31 32 33 34 35 36 37 38 39 40 41 42 43 44 45 46 47 48 49 50 |
# 不要な表現を除去し、1文ごとに切り分ける def preprocess(title): path = "novels/{}.txt".format(title) with open(path,"r") as f: novel = f.read() # 改行で分割 novel = novel.split("\n") # 不要な表現、会話文の鍵括弧を除去 # 1文ごとに切分け novel_ = [] for paragraph in novel: paragraph = re.sub("\\u3000","",paragraph) # 青空文庫のデータに含まれる不要表現 paragraph = re.sub("《[^《》]*》","",paragraph) paragraph = re.sub("[.*見出し]","",paragraph) paragraph = re.sub("[#地から.字上げ]","",paragraph) if paragraph.startswith("「") and paragraph.endswith("」"): paragraph = paragraph[1:-1] novel_ += sentence_tokenizer.tokenize(paragraph) novel = novel_ # 空の要素と鍵括弧のみの要素の除去 novel_ = [] for sentence in novel: if sentence != "" and sentence != "「" and sentence != "」": novel_.append(sentence) novel = novel_ # 不要なヘッダを削除 hyphen_seperater_count = 0 header_end_ix = 0 for i,sentence in enumerate(novel): if sentence == '-------------------------------------------------------': hyphen_seperater_count += 1 if hyphen_seperater_count == 2: header_end_ix = i del novel[:header_end_ix+1] # 不要なフッタを削除 footer_start_ix = 0 for i,sentence in enumerate(novel): if sentence.startswith("底本:"): footer_start_ix = i del novel[footer_start_ix:] return novel |
それぞれの小説データに前処理を適用し、分類のためのラベルを付けます。
|
1 2 3 4 5 6 7 8 9 10 11 12 13 14 15 16 |
title_texts = ["kokoro","gan"] # 前処理の適用 novels = {} for title_text in title_texts: novels[title_text] = preprocess(title_text) # 「こころ」を"0"、「雁」を"1"としてラベル付け for key in novels.keys(): if key == "kokoro": novels[key] = [[i,"0"] for i in novels[key]] elif key == "gan": novels[key] = [[i,"1"] for i in novels[key]] print("「こころ」のデータ数:{}".format(len(novels["kokoro"]))) print("「雁」のデータ数:{}".format(len(novels["gan"]))) |
![]()
やはりデータ数もアンバランスになってしまいました。最後にデータを結合し、train、dev、testデータに分割、tsvファイルとして出力します。
|
1 2 3 4 5 6 7 8 9 10 11 12 13 14 15 16 17 18 19 20 21 22 23 24 25 26 27 28 29 30 |
data = novels["gan"] + novels["kokoro"] random.shuffle(data) sep1 = int(len(data) * 0.6) sep2 = int(len(data) * 0.8) train = data[:sep1] dev = data[sep1:sep2] test = data[sep2:] print("train_size:{}".format(len(train))) print("dev_size:{}".format(len(dev))) print("test_size:{}".format(len(test))) # 各データの出力 with open("train.txt","w",encoding="utf8") as f: writer = csv.writer(f,delimiter="\t") writer.writerow(["text","label"]) writer.writerows(train) with open("dev.txt","w",encoding="utf8") as f: writer = csv.writer(f,delimiter="\t") writer.writerow(["text","label"]) writer.writerows(dev) with open("test.txt","w",encoding="utf8") as f: writer = csv.writer(f,delimiter="\t") writer.writerow(["text","label"]) writer.writerows(test) |

これでデータの準備ができました。
3.fine-tuning部分の実装
次にBERTに分類タスクを解かせるための実装を行います。BERTのコードやpre-trained modelはgoogle-reserch/bertリポジトリで公開されています。モデルはmultilingual.mdの“BERT-Base, Multilingual Cased (New, recommended)” をダウンロードしてください。今回はタイトルにもある通り日本語pre-trained model を使用するため、fine-tuning部分のみの実装です。run_classifier.pyが分類タスクを解かせるためのコードであるため、これを一部改変します。
まずはタスク処理のためのクラスを追加します。run_classifier.py内には、もともとXnliProcessor、MnliProcessor、MrpcProcessor、ColaProcessorが用意されているので、その後ろに追加しましょう。
|
1 2 3 4 5 6 7 8 9 10 11 12 13 14 15 16 17 18 19 20 21 22 23 24 25 26 27 28 29 30 31 32 33 34 35 36 37 38 39 40 |
class AuDiProcessor(DataProcessor): def read_tsv(self, path): tsv_data = [] with open(path,"r",encoding="utf8") as f: reader = csv.reader(f,delimiter="\t") count = 0 for row in reader: if len(row) > 0 and count > 0: tsv_data.append([row[0],row[1]]) count += 1 return tsv_data def get_train_examples(self,data_dir): """Gets a collection of `InputExample`s for the train set.""" return self._create_examples(self.read_tsv(os.path.join(data_dir,"train.txt")),"train") def get_dev_examples(self,data_dir): """Gets a collection of `InputExample`s for the dev set.""" return self._create_examples(self.read_tsv(os.path.join(data_dir,"dev.txt")),"dev") def get_test_examples(self,data_dir): """Gets a collection of `InputExample`s for prediction.""" return self._create_examples(self.read_tsv(os.path.join(data_dir,"test.txt")),"test") def get_labels(self): """Gets the list of labels for this data set.""" return ["0","1"] #データ作成時につけたラベルと同じものにする def _create_examples(self,lines,set_type): """Creates examples for the training and dev sets.""" examples = [] for (i,line) in enumerate(lines): guid = "{}-{}".format(set_type,i) text_a = tokenization.convert_to_unicode(line[0]) label = tokenization.convert_to_unicode(line[1]) examples.append(InputExample(guid=guid,text_a=text_a,text_b=None,label=label)) return examples |
main関数のprocessorsの中に、作成したProcessorのキーを任意のタスク名として追加します。実行時にタスク名を指定しますが、入力にかかわらずすべて小文字に変換されるため、タスク名はすべて小文字にする必要があります。
|
1 2 3 4 5 6 7 |
processors = { "cola": ColaProcessor, "mnli": MnliProcessor, "mrpc": MrpcProcessor, "xnli": XnliProcessor, "audi": AuDiProcessor, # タスク名と上で作成したProcessorを追加 } |
上記のように改変を行いました。
4.モデルの学習
学習の実行コマンドは以下の通りです。[path]の部分は適切に置き換えてください。
|
1 2 3 4 5 6 7 8 9 10 11 12 13 14 |
python run_classifier.py \ --task_name=AuDi \ --do_train=true \ --do_eval=true \ --data_dir=[path] \ --vocab_file=[path]/vocab.txt \ --bert_config_file=[path]/bert_config.json \ --init_checkpoint=[path]/bert_model.ckpt \ --max_seq_length=128 \ --train_batch_size=32 \ --learning_rate=2e-5 \ --num_train_epochs=3.0 \ --output_dir=[path] \ --do_lower_case=False |
実行時間はAWSのEC2のp2.xlargeインスタンス上で694秒でした。アウトプットとして以下のようなものが出てきます。
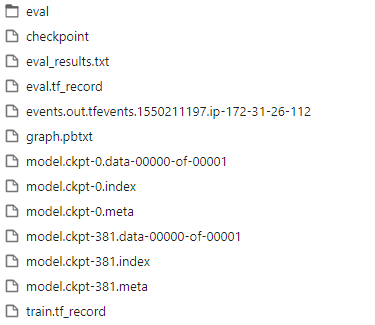
モデルの後ろの数字はデータによって変わります。今回は「model.ckpt-381」を使います。
5.推論/精度確認・比較
推論の実行コマンドは以下の通りです。[path]の部分は適切に置き換えてください。また[model]の部分は、上記の通り今回は「model.ckpt-381」を指定します。
|
1 2 3 4 5 6 7 8 9 10 11 12 13 |
python run_classifier.py \ --task_name=AuDi \ --do_predict=True \ --data_dir=[path] \ --vocab_file=[path]/vocab.txt \ --bert_config_file=[path]/bert_config.json \ --init_checkpoint=[path]/[model] \ --max_seq_length=128 \ --train_batch_size=32 \ --learning_rate=2e-5 \ --num_train_epochs=3.0 \ --output_dir=[path] \ --do_lower_case=False |
実行時間は4.モデルの学習と同様の環境で42秒でした。アウトプットとしては以下のようなものが出てきます。
![]()
今回は評価方法として、予測結果全体と、答えがどれぐらい一致しているかを判断する指標であるaccuracyを使います。出力されたtest_results.tsvを評価するとaccuracyは0.9506でした。
ベンチマークとしてDoc2VecとSVM、XGBoostを用いて同様のタスクを行った結果のaccuracyは以下の通りでした。
Doc2Vec + SVM: 0.9278
Doc2Vec + XGBoost: 0.9065
比較すると、BERTの精度が上回りました!
まとめ
差自体は大きいものではありませんでしたが、90%以上でさらにスコアを伸ばすためにはより高い情報の表現力が必要だと考えられます。今回の結果は、BERTが高い表現力を備えていることのあらわれといえるでしょう。加えて簡単な分類タスクであれば、わずかなコーディングのみでできる手軽さも実感できました。BERTが自然言語処理における新たなスタンダードとなるかもしれない。と言われる理由の一端を確認することができたのではないでしょうか。今回行ったタスク以外にも、BERTが高い性能を示したものはたくさんあります。今後もBERTを使って様々な問題に挑戦していきたいと思います!

執筆者プロフィール

- tdi AI・コグニティブ推進部
-
配属以降、自然言語処理を中心として機械学習について取り組んできました。自然言語処理のポテンシャルに、大きな期待を抱いています。
現在の目標は、kaggleでメダルを取ること。
この執筆者の最新記事
 AI2019年3月26日【第二回】日本語pre-trained modelで試すBERT