
バックエンドAPIに認可を実装する
第4回となる今回は、前回作成したSpring BootのバックエンドAPIにSpring Securityを使用して、認可機能を実装していこうと思います。
これにより、Cognitoで認証に成功したユーザーだけがこのAPIを実行できるようになります。
ちなみに前回の記事はコチラ。
React×Spring Bootな構成をAWS Fargateで動かす(3)
Spring Securityの有効化
前回作成したバックエンドAPIは誰からでも実行できる状態でしたので、ここにSpring Securityを入れてセキュリティを高めていきます。
といってもやることはシンプル。
pom.xmlに以下のような依存関係を追加するだけです。
|
1 2 3 4 5 6 7 8 9 10 |
<dependencies> <dependency> <groupId>org.springframework.boot</groupId> <artifactId>spring-boot-starter-security</artifactId> </dependency> <dependency> <groupId>org.springframework.boot</groupId> <artifactId>spring-boot-starter-oauth2-resource-server</artifactId> </dependency> </dependencies> |
保存したら、一度Postmanから実行してみましょう。
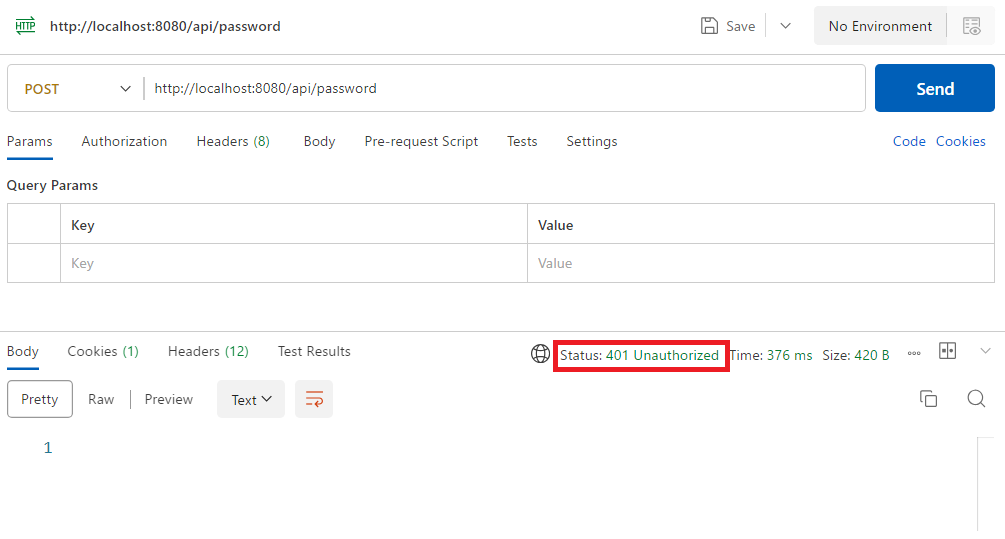
はい!バッチリ拒否されました!
リソースサーバーの設定
Spring Securityで認可を実装するために、リソースサーバーを設定し、使用します。
リソースサーバーとは、OAuth2やOpenID Connectといったプロトコルを使用して、クライアントアプリケーションにリソース(例: APIやデータ)を提供するサーバーを指します。
おおまかに認可の流れをシーケンス図としてMermaid形式で出力してみました。
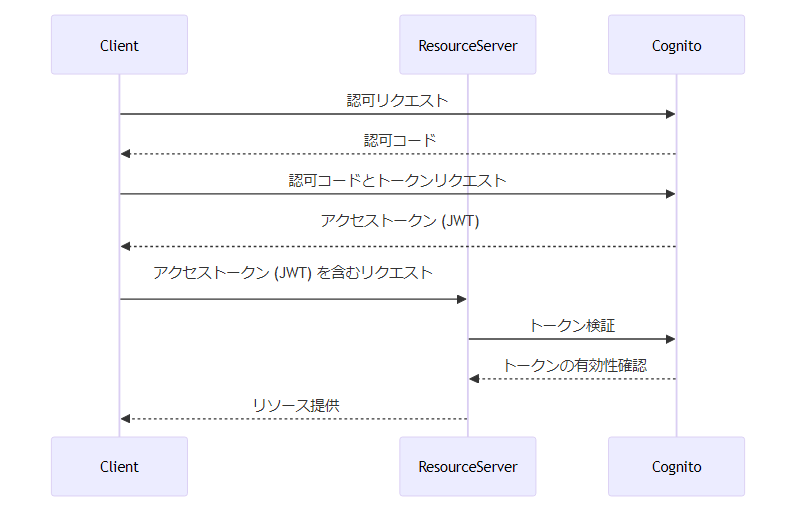
リソースサーバーは認可サーバーであるCognitoから発行されたアクセストークンを検証し、そのトークンが有効であるか、適切な範囲や権限を持っているかを確認します。
その上で、保護されたリソースまたはAPIエンドポイントへのアクセスを許可します。
Spring Securityのリソースサーバーの設定をするには、application.ymlに以下のようにsecurityのエントリを追加します。
|
1 2 3 4 5 6 7 8 9 10 11 12 13 14 15 |
spring: application: name: miso-backend security: oauth2: resourceserver: jwt: jwk-set-uri: ${JWK_SET_URI} server: servlet: context-path: /api cors: allowedOrigins: ${ALLOWED_ORIGINS} |
jwk-set-uriは、Cognitoユーザープールのトークン署名キーURLに相当するもので、ユーザープールの概要からも確認できます。
リージョンとユーザープールID以外は固定ですね。
これでリソースサーバーを参照することができたので、リクエストされたURIに応じてリソースサーバーを使用するコードを書いていきます。
configパッケージを右クリックして、New Java File→Class…を選択してSecurityConfigクラスを作成してください。
|
1 2 3 4 5 6 7 8 9 10 11 12 13 14 15 16 17 18 19 20 21 22 23 24 25 26 27 28 29 30 31 32 33 34 35 |
package jp.co.tdi.miso_backend.config; import org.springframework.context.annotation.Bean; import org.springframework.context.annotation.Configuration; import org.springframework.http.HttpMethod; import org.springframework.security.config.annotation.web.builders.HttpSecurity; import org.springframework.security.config.annotation.web.configuration.EnableWebSecurity; import org.springframework.security.config.Customizer; import org.springframework.security.web.SecurityFilterChain; /** * セキュリティ設定を構成するクラス。 */ @Configuration @EnableWebSecurity public class SecurityConfig { /** * セキュリティフィルターチェーンを構成します。 * * @param http HttpSecurityオブジェクト * @return 構成されたSecurityFilterChainオブジェクト * @throws Exception 設定中にエラーが発生した場合 */ @Bean public SecurityFilterChain securityFilterChain(HttpSecurity http) throws Exception { http.csrf(csrf -> csrf.disable()) .authorizeHttpRequests((authz) -> authz .requestMatchers("/healthcheck").permitAll().requestMatchers(HttpMethod.OPTIONS, "/**").permitAll().anyRequest().authenticated()) .oauth2ResourceServer(oauth2 -> oauth2.jwt(Customizer.withDefaults())); return http.build(); } } |
CSRFは無効化した上で、ヘルスチェック用URL以外のリクエストは認可が必要となるように設定しているコードになっています。
これに合わせてここでヘルスチェック用のエンドポイントも作成しておきましょう。
controllerパッケージを右クリックして、New Java File→Class…を選択してHealthCheckControllerクラスを作成してください。
|
1 2 3 4 5 6 7 8 9 10 11 12 13 14 15 16 17 18 19 20 21 22 23 24 |
package jp.co.tdi.miso_backend.controller; import org.springframework.http.HttpStatus; import org.springframework.http.ResponseEntity; import org.springframework.web.bind.annotation.GetMapping; import org.springframework.web.bind.annotation.RestController; /** * アプリケーションのヘルスチェック用のコントローラです。 */ @RestController public class HealthCheckController { /** * ヘルスチェックのエンドポイントです。 アプリケーションが正常に動作しているかを確認します。 * * @return レスポンスエンティティ(ステータスコード200とメッセージを含む) */ @GetMapping("/healthcheck") public ResponseEntity<String> healthCheck() { String response = "{\"status\":\"UP\"}"; return new ResponseEntity<>(response, HttpStatus.OK); } } |
ローカルでの実行時に環境変数COGNITO_USERPOOL_IDを設定するためにlaunch.jsonを編集します。
先ほどのシーケンス図の通り、リソースサーバーはCognitoのトークン署名キーURLにアクセスするので、ローカル環境がプロキシ経由でインターネットにアクセスしている場合は、ここで合わせてVM引数にプロキシの設定もしておきましょう。
|
1 2 3 4 5 6 7 8 9 10 11 12 13 14 15 16 17 |
{ "version": "0.2.0", "configurations": [ { "type": "java", "name": "MisoBackendApplication", "request": "launch", "mainClass": "jp.co.tdi.miso_backend.MisoBackendApplication", "projectName": "miso-backend", "env": { "ALLOWED_ORIGINS": "http://localhost:3000", "JWK_SET_URI": "https://cognito-idp.ap-northeast-1.amazonaws.com/ap-northeast-1_XXXXXXXXX/.well-known/jwks.json" }, "vmArgs": "-Dhttp.proxy.host=プロキシサーバーのホスト名 -Dhttp.proxy.port=プロキシサーバーのポート番号 -Dhttps.proxy.host=プロキシサーバーのホスト名 -Dhttps.proxy.port=プロキシサーバーのポート番号 -Dhttp.nonProxyHosts=localhost|127.0.0.1" } ] } |
一旦ここでSpring Bootのプロセスを再起動しておきましょう。
フロントエンドからの呼び出し
まずはそのままフロントエンドから呼び出したらどうなるでしょうか?
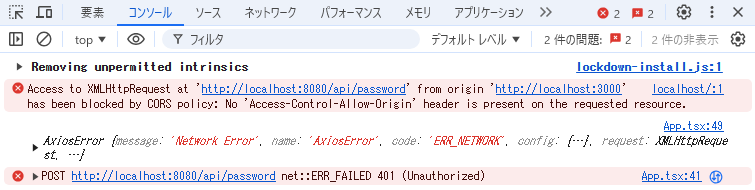
HTTP 401 Unauthorisedではじかれました。
まだアクセストークンを含んでいないリクエストなので、正しい動きと言えそうです。
それでは、前回作成したフロントエンドの呼び出しにCognitoから取得したアクセストークンをセットすることで認可機能付きのAPIを呼び出せるようにします。
具体的には、Amplify AuthのfetchSession()を呼び出して返ってきたトークンからアクセストークンを取り出し、AuthorizationヘッダにBearerトークンをセットします。
App.tsxのgeneratePasswordを以下のように書き換えてください。
|
1 2 3 4 5 6 7 8 9 10 11 12 13 14 15 |
const generatePassword = async () => { try { const session = await fetchAuthSession(); const apiUrl = import.meta.env.VITE_API_URL_BASE || `${window.location.origin}/api`; const response = await axios.post(`${apiUrl}/password`, {}, { headers: { "Content-Type": "application/json", Authorization: `Bearer ${session.tokens?.accessToken?.toString()}`, } }); setPassword(response.data); } catch (err) { console.log(err); } }; |
これで無事に認可機能付きのREAT APIをReactのフロントエンドから呼び出すことができるようになりました😆
Spring SecurityにCORS設定を集約
このままでもいいのですが、CORSの設定を前回作成したWebConfigからSecurityConfigにまとめるやり方のほうが一般的(?)のようです。
SecurityConfigクラスを以下のように書き換えて、WebConfigクラスとはバイバイすることもできます。
|
1 2 3 4 5 6 7 8 9 10 11 12 13 14 15 16 17 18 19 20 21 22 23 24 25 26 27 28 29 30 31 32 33 34 35 36 37 38 39 40 41 42 43 44 45 46 47 48 49 50 51 52 53 54 55 56 57 58 59 60 61 |
package jp.co.tdi.miso_backend.config; import org.springframework.beans.factory.annotation.Autowired; import org.springframework.context.annotation.Bean; import org.springframework.context.annotation.Configuration; import org.springframework.http.HttpMethod; import org.springframework.security.config.annotation.web.builders.HttpSecurity; import org.springframework.security.config.annotation.web.configuration.EnableWebSecurity; import org.springframework.security.config.Customizer; import org.springframework.security.web.SecurityFilterChain; import org.springframework.web.cors.CorsConfiguration; import org.springframework.web.cors.CorsConfigurationSource; import org.springframework.web.cors.UrlBasedCorsConfigurationSource; import java.util.Arrays; /** * セキュリティ設定を構成するクラス。 */ @Configuration @EnableWebSecurity public class SecurityConfig { @Autowired private CorsProperties corsProperties; /** * セキュリティフィルターチェーンを構成します。 * * @param http HttpSecurityオブジェクト * @return 構成されたSecurityFilterChainオブジェクト * @throws Exception 設定中にエラーが発生した場合 */ @Bean public SecurityFilterChain securityFilterChain(HttpSecurity http) throws Exception { http.cors(cors -> cors.configurationSource(corsConfigurationSource())) .csrf(csrf -> csrf.disable()) .authorizeHttpRequests((authz) -> authz .requestMatchers("/healthcheck").permitAll().requestMatchers(HttpMethod.OPTIONS, "/**").permitAll().anyRequest().authenticated()) .oauth2ResourceServer(oauth2 -> oauth2.jwt(Customizer.withDefaults())); return http.build(); } /** * CORS設定を構成するソースを提供します。 * * @return 構成されたCorsConfigurationSourceオブジェクト */ @Bean public CorsConfigurationSource corsConfigurationSource() { CorsConfiguration configuration = new CorsConfiguration(); configuration.setAllowedOrigins(Arrays.asList(corsProperties.getAllowedOrigins().split(","))); configuration.setAllowedMethods(Arrays.asList("GET", "POST", "PUT", "DELETE", "OPTIONS")); configuration.setAllowedHeaders(Arrays.asList("*")); configuration.setAllowCredentials(true); UrlBasedCorsConfigurationSource source = new UrlBasedCorsConfigurationSource(); source.registerCorsConfiguration("/**", configuration); return source; } } |
こちらのコードでも呼び出すことができました😆
が!ここで第1回で書いていた構成上の問題に気付いてしまいました・・・

次回はそれについて書きたいと思います!
それでは、また次回に👋
シリーズ記事
- React×Spring Bootな構成をAWS Fargateで動かす(1) ~ Cognitoの構築
- React×Spring Bootな構成をAWS Fargateで動かす(2) ~認証付きフロントエンドの作成
- React×Spring Bootな構成をAWS Fargateで動かす(3) ~バックエンドの作成
- React×Spring Bootな構成をAWS Fargateで動かす(4) ~認可機能の追加
- React×Spring Bootな構成をAWS Fargateで動かす(5) ~構成上の問題の解消方法
- React×Spring Bootな構成をAWS Fargateで動かす(6) ~ Fargateのデプロイ(準備編)
- React×Spring Bootな構成をAWS Fargateで動かす(7) ~ Fargateのデプロイ(実装・デプロイ編)

執筆者プロフィール

- tdi デジタルイノベーション技術部
-
昔も今も新しいものが大好き!
インフラからアプリまで縦横無尽にトータルサポートや新技術の探求を行っています。
週末はときどきキャンプ場に出没します。
2024-2025 Japan AWS All Certifications Engineers